Tokyo DisneySea

Last week we were lucky enough to visit Tokyo! I was invited to teach a Lindy Hop workshop with my pals, Lennart Westerlund and Sing Lim. We also visited with our niece who is preparing to perform at Tokyo Disneyland in the show, One Man’s Dream II.

Video – Part 1

Geoff has put together this beautiful video and another video is on its way along with his extensive, excellent photography.

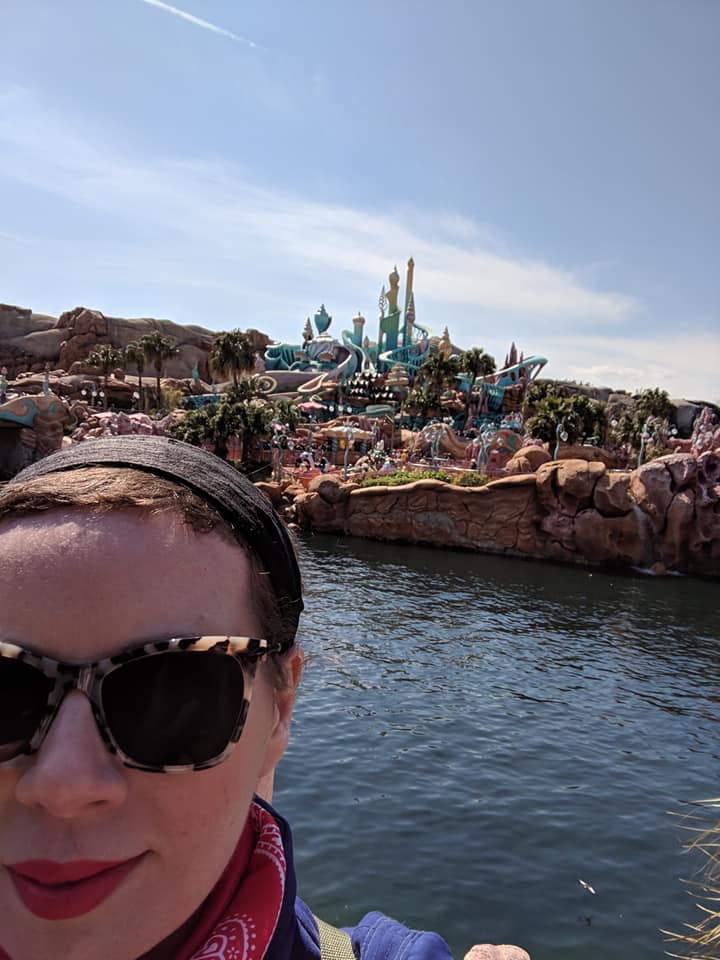
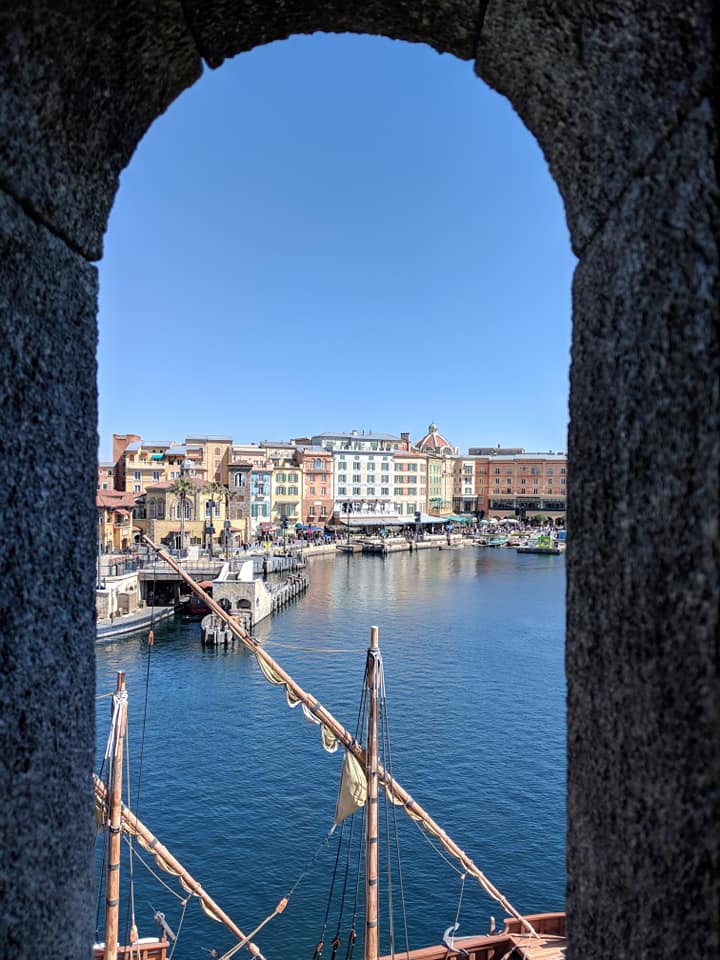
Tokyo DisneySea is often voted the best theme park in the world and after our experience, I would wholeheartedly I agree! It’s stunning. And when it comes to embracing themes, they’ve gone the extra mile and really made it something special. Originally, the park was meant to be in California but they realized it would be too expensive and shelved it until some wealthy Japanese investors came along and voila! An incredible and unique Disney park in Japan.

Best Theme Park!

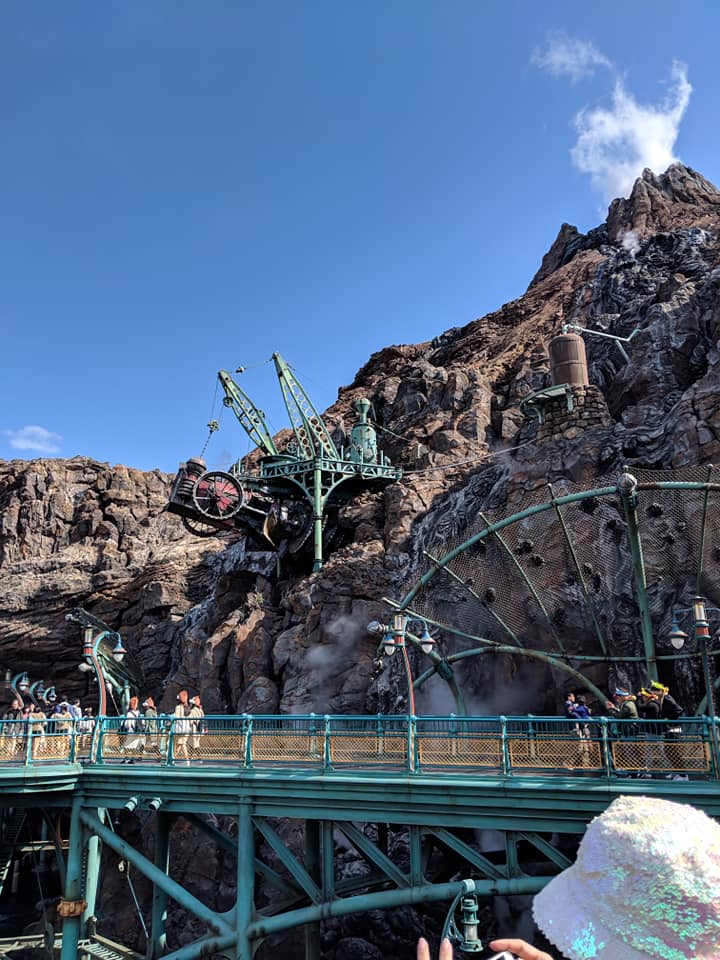
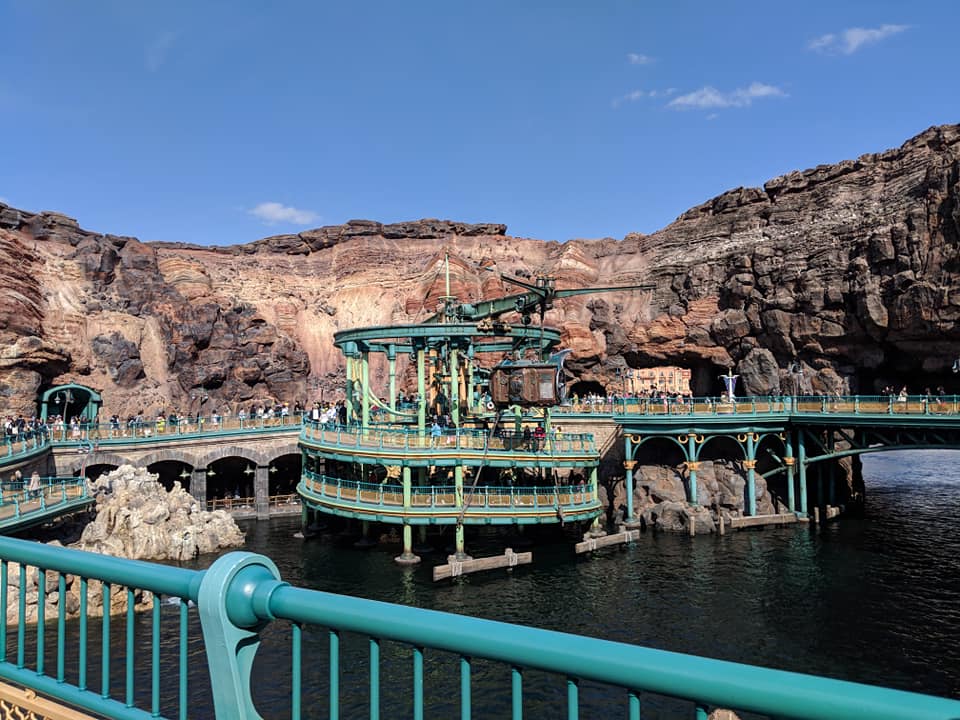
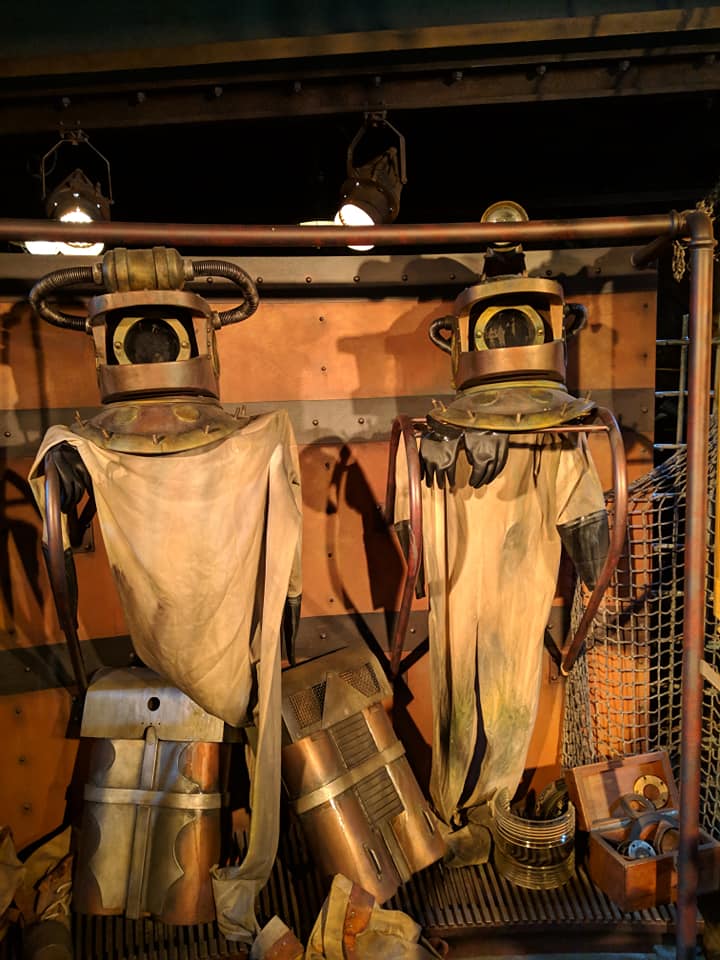
Besides the fact that it’s beautiful, my favourite thing about the park is the commitment to the themes. I particularly love the Mysterious Island/Jules Verne area with 20,000 Leagues Under the Sea and Journey to the Center of the Earth. I was really excited about the latter and it lived up to my expectations. LOVED it! Great story, settings, and ride through and through. It’s now in my top favourite rides of all time.

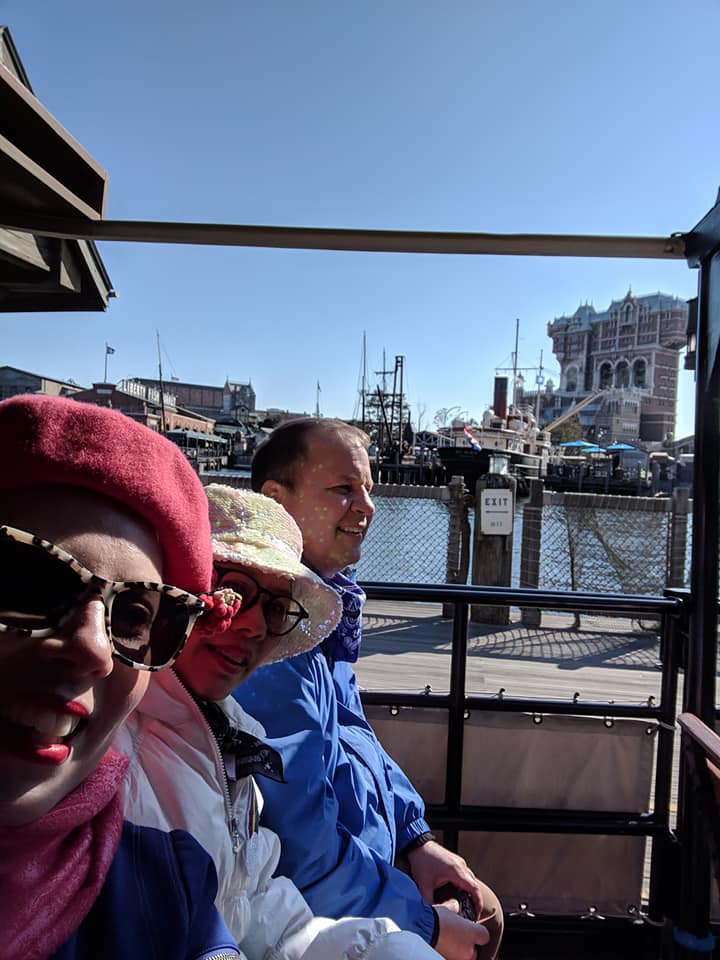
I was also really excited about the alternate story line for Tower of Terror. It was neat to experience it with a different story. I guess in some of the Asian cultures, ghosts are not seen as something to be trifled with so instead they implemented a theme with a tribal relic that puts a curse on the Hightower character who is big in the Asian parks. I was a little disappointed that it was more like the abbreviated California version of the ride and only went up and down rather than moving forward on the tracks like the Florida version. It was good but not as great as the full Florida classic.

FastPasses

Getting fastpasses at Tokyo Disney Sea & Land was a bit chaotic at first, but then I rather liked it. They’re still on the old paper system which means you have to hustle to get your first pass once you arrive a the park and then you need to pay attention to the time listed on the paper because it will give you the time when you’re allowed to get your next fast pass.

Layout

When you enter the park, you hang left which is where everything is. Unlike most parks, it doesn’t flow in a big circle. If you go right, you still end up having to go left on the other side of the water and you can’t get all the way around the way you would expect.

The first priority was to get the Tower of Terror fastpass and it was a total zoo to get it. You have to line up to get the fastpasses, which is annoying. But the line does move more quickly than a ride line. Once we had our fastpasses, we went on to explore the stunning park.

We started with a ride on the boats, which we were able to walk right onto with no line. It was a great way to get an overview of the park and appreciate how beautiful it is. I recommend it. Then we did about a 30 minute wait for 20,000 leagues under the sea which I very much enjoyed.

When it came time for us to be able to get another fastpass, we beelined for the Journey to the Center of the Earth line where we had to queue again. It’s a very popular ride. But I can see why! Like I said, it was amazing and there’s nowhere else that you can experience that ride. Loved it.

We opted to do the single rider option for Indiana Jones, which is very close to the one in California, which allows you to join the fastpass line. That made a lot of sense rather than using another fastpass on it.

Our third fastpass was on the Raging Spirits ride in the evening. It looks really cool from the outside, located right beside Indiana Jones. It’s a very smooth roller coaster but not really that special; definitely not as cool as my favourite coaster, which is Expedition Everest at Animal Kingdom.

We were only able to get 3 fastpasses since most of them had “sold out” by the time we were eligible for a 4th.

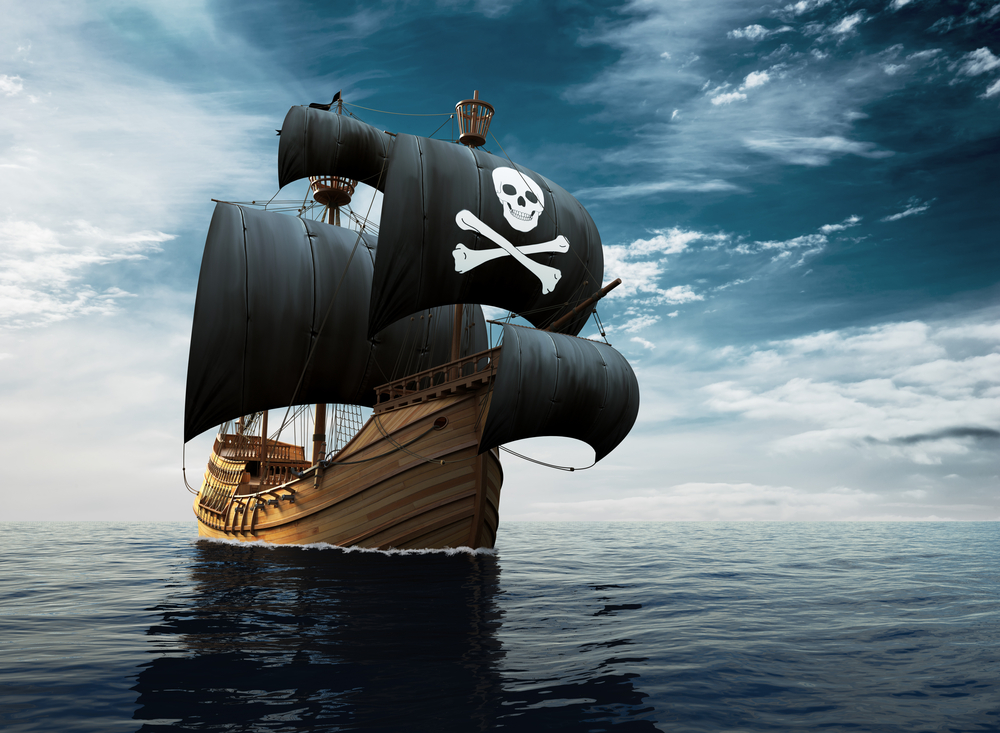
One area that was Geoff’s favourite is the area around the pirate ship and the Magellan observatory area. It was really beautiful and special. Really, we should have returned there again later to enjoy it more. I was a bit distracted when we went to it because we hadn’t been on many attractions yet and I was eager to do so before the park got too busy, but the attention to detail and beauty of it was really unique and wonderful

Another fun surprise was walking right on to Sindbad’s Storybook Adventure ride in the Arabian Coast area. I guess it’s not super popular and also is able to accommodate a lot of people. I really enjoyed it! It’s kind of fun to do a ride where you have no idea about the story and I thought it was presented very well. And we enjoyed the catchy song, which I think is Geoff’s new theme song.

Sing and I attended King Triton’s Concert, a Little Mermaid show, while Geoff did some photography. There is a chance that my niece will apply to be in that show next year when her current contract is done so I enjoyed seeing what the role would entail. It’s all aerial work, no pun intended, and was pretty cute.

It was very convenient to grab the trolley, which runs between the front American Waterfront area and the Mysterious Island area. We rode it several times both for the view and to get around.

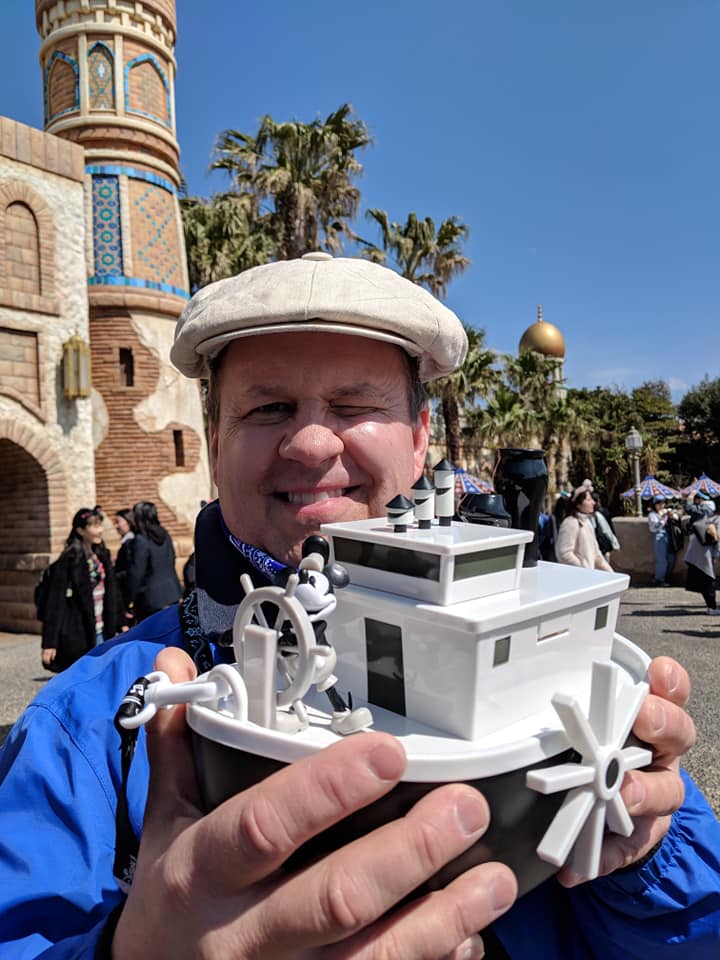
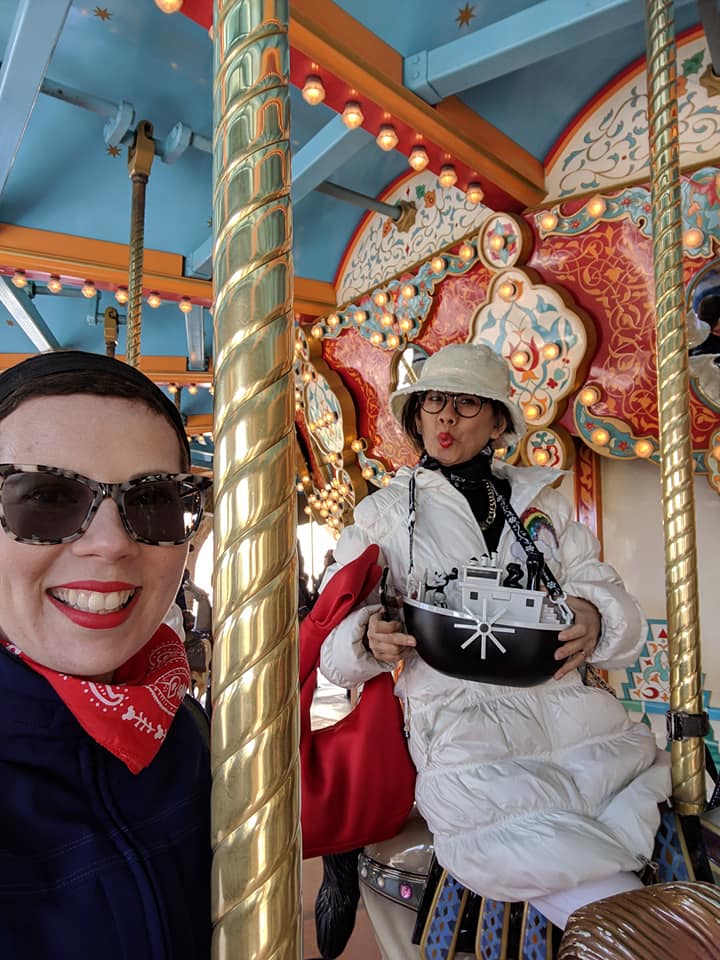
Popcorn is a big thing at both Tokyo parks. They have flavoured popcorn (we got curry) and the big thing is to get a collectable popcorn container of some kind. Geoff and Sing both picked the Steamboat Willie container.

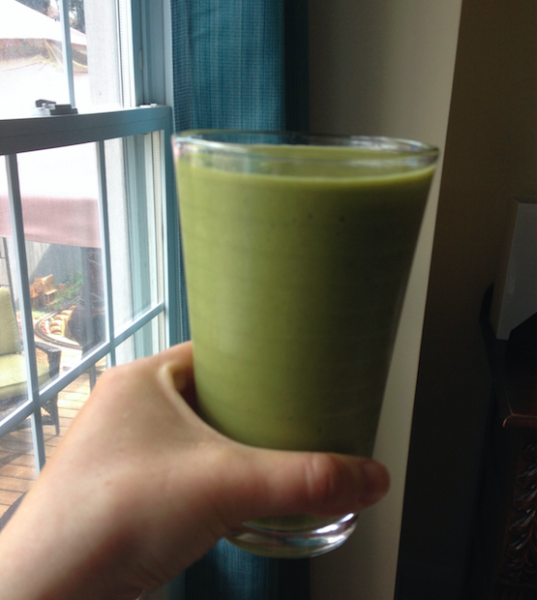
I’ll continue to add to this post as I remember things that I think were important, but mainly I’m excited to see the rest of Geoff’s footage and photographs. The ones here so far are just from my phone.

To be continued…

Savoury Jackfruit Patties

If you’ve tried or heard about jackfruit “pulled pork”, it’s the dish that inspired me to make a better veggie patty that’s perfect for Thanksgiving and Christmas and would make a great burger patty too! They make the perfect Tofurkey Alternative.

You know what’s tough? Trying to keep a vegetarian diet in a world full of soy when you’re soy-intolerant. Meanwhile, many North American veg-heads eat too much soy to begin with, which can upset your hormonal balance.

For years I’ve been looking for the perfect soy-free meat alternative to have with gravy and cranberry sauce at Thanksgiving and Christmas and last year, I finally found it. I had tried some pretty great recipes before, like the Oh She Glows burgers, but this is now definitely my go-to.

The idea finally came to me after I got around to making jackfruit pulled pork for myself. I had tried jackfruit as a pulled pork alternative at Niagara Veg Fest and some restaurants, but it wasn’t until I made it for myself that the lightbulb went off.

If you aren’t familiar with it yet, unripened jackfruit has the surprising texture of meat! It’s pretty amazing! And it takes on whatever seasoning you add and produces a wonderful texture and mouth feel. I read somewhere that buying unripened jackfruit can really destroy your knives and it’s very convenient to use canned unripened jackfruit which I’ve found at Asian grocery stores.

For our Thanksgiving feast this weekend I used 5 cans of jackfruit and made about 20 patties so I would say one can of jackfruit makes about 4 patties.

Step 1.

Soak the jackfruit and remove all the seeds.

 Step 2.

Use your fingers to separate all the jackfruit “meat” into strips to prepare it to sautee with oil, garlic, and spices. (See recipe below for full details.)

Step 3.

This next part doesn’t look very glamourous but it’s the part that gives the patties a richness and also binds it together. Use ground chia or flax seed (I used chia) and almond butter to make a batter. (See recipe below for full details.)

Step 4.

Mix the sauteed jackfruit mixture into the batter. (See recipe below for full details.)

Step 5.

Form the patties and bake them at 350 for about 12 minutes on each side. I use an ice cream scoop and use non-stick silpat sheets. (See recipe below for full details.)

Step 6.

They’ll be ready when they’re golden and crispy and looking suspiciously meaty. Serve and enjoy!

Savoury Jackfruit Patties – Recipe

The above photos show this recipe multiplied by 5. The following recipe makes 4 patties.

Ingredients

  • 1 can of unripened jackfruit in water
  • 1 tablespoon of grapeseed oil (or a cooking oil of choice)
  • 1 clove of garlic, minced
  • 1 teaspoon of low sodium Old Bay or your favourite “meat” spice blend
  • 2 teaspoon of ground chia or ground flax
  • 1/4 cup of water or vegetable stock
  • 1 heaping tablespoon of almond butter
  • salt and pepper to taste

Directions

  1. Start by soaking and rinsing your unripened jackfruit in water. Rinse it really well.
  2. Go through the jackfruit and make sure there are no seeds. The seeds are quite soft and can be eaten if you accidentally miss any, but it’s better to remove them.
  3. Separate the jackruit “meat” using your fingers from the core of the jackfruit which is harder. You can cut up the jackfruit core and include it or discard it. When I made a large quantity, I included the core but ran it through the food processor to pulverize it.
  4. Take a non-stick pan and put it on medium to high heat with the oil and the garlic. Sautee it for a minute and then add the jackfruit and the spices. Sautee the jackfruit stirring regularly until it starts to change colour and seem “cooked”, about 7 minutes. Remove the pan from the heat and let it cool.
  5. Preheat oven to 350.
  6. In a bowl, mix the ground chia with the water and let it start to congeal for about 30 seconds, then mix in the almond butter to make a batter. It shouldn’t be too thick or too loose, but an easy to stir paste.
    1. Notes about this recipe: I’m not much of a measurer. When you make these, you’ll want to adjust the ratio of the chia, liquid, and almond butter to make a paste that’s thick but not overly stiff. If you find it’s too hard to mix in the jackfruit, add more liquid, or if it’s too liquidy, add more chia and/or almond butter.
  7. Mix in the sauteed jackfruit mixture.
  8. Take a cookie sheet and a silpat non-stick baking sheet or use line your pan with parchment paper. Scoop the mixture onto the pan to make patties. I use an ice cream scoop and then flatten the mixture into a patty shape.
  9. Make the patties for about 12 minutes on one side. Then flip and bake for another 10-12 minutes on the other side or until golden and somewhat crispy.
  10. Serve with cranberry sauce and your favourite vegetarian gravy and enjoy!

My favourite recipe of the year – baked crispy eggplant parmesan

I have a blog entitled Green Smoothies & Juice but it’s a bit misleading. From over there it looks like I’m 100% vegan and I do try to eat a vegan diet as often as possible.

However, I’ve been obsessed with this recipe for eggplant parmesan for the last couple of months. I highly recommend it! It’s a lacto ovo vegetarian recipe. It’s baked, not fried, and the eggplant comes out crispy. Even my husband who doesn’t like eggplant likes it! It’s very convenient in the fridge for up to 3 days and also freezes well.

Ingredients

  • 1 big eggplant or 2 normal sized eggplants, peeled and cut into a little less 1/3-inch slices length-wise of the eggplant (the long way)
  • 1/2 cup of panko bread crumbs (or almond flour to make it paleo)
  • 1/2 cup grated parmesan
  • 2 eggs beaten (I’m sure eggwhites would work for mom)
  • Salt for sweating the eggplant
  • Tomato sauce of choice for serving (not baking)
  • Mozzarella for melting (optional)

Directions

  • Place eggplant slices in a colander and sprinkle both sides of each slice with salt. Allow to sit for at least 3 hours so that the extra moisture comes out of it. Wipe excess moisture from eggplant slices with paper towels.
  • Preheat oven to 350 degrees F (175 degrees C). Use non-stick silpat mats, otherwise grease a baking sheet.
  • Set up a breading station by mixing the bread crumbs and Parmesan cheese together in one dish.
  • In another dish, have the beaten egg ready.
  • Coat each slice of eggplant with the egg first, then with bread crumb mixture.
  • Arrange the coated eggplant slices in a single layer on the prepared baking sheet.
  • Bake in the preheated oven on each side until lightly browned and crisp. This will be between 11 and 15 minutes on each side depending on your oven.
  • Serve on top of tomato sauce but only just before you’re going to eat it. That way it doesn’t get soggy the way it would if you poured the tomato sauce over it.
  • You can also melt mozzarella over it and serve on top of tomato sauce which is especially delicious, alone or with pasta.

**The eggplant cutlets keep in the fridge really well for 3 days. They also freeze really well and you can just heat up a couple of slices at a time, preferably in an oven, not microwave, so that it’s crispy.

**If you have leftover parmesan and breadcrumbs, you can mix it in with eggs and make a crispy omelette kind of thing that’s really tasty to use up leftover ingredients.

Vienna, June 2018

We had a wonderful time in Vienna in June!

It was a business and pleasure trip. You can read about our reason for traveling to Vienna here.

I don’t have time to write about the entire trip and I’ve left it a bit long, but here are my top recommendations for Vienna that I shared with a friend who was traveling there shortly after we returned.

***

Schonbrunn Palace is awesome. Save it for good weather. The ticket situation was annoying. You have to get them right at the front gate in the building on your immediate left. You can book a time for the tour, which we enjoyed a lot. While you wait for your tour, the gardens are free and fabulous. This is definitely worth at least a half day and depending on how long you spend in the gardens, could be a lot longer.

We liked the ease of the Vienna Pass which includes the Hop on, Hop Off Bus. That way we could pop into a lot of places but not feel like we had to stay. The bus is great and the red line in particular gives you the full tour of the downtown which helps you get to know the layout of the centre of the city where most of the stuff is.

The Hofburg Palace is also great. I would have liked to see more of it. When we were there, the Spanish Rididng School was closed for a few days to prepare a ball which was disappointing. It’s supposed to be a highlight.

Definitely if it’s opened, the Spanish Riding School, which is part of the Hofburg. I think if I were to do it again, I would have gone to more of the various museums and exhibits that are part of the Hofburg. There are a few different parts attached to it.
Beyond that, I went to some art galleries that were nice and there are lots of cathedrals but the other parts don’t stand out quite as much.

Had amazing apple strudel at a bakery called Backerei Cafe Felzl.

We had a funny experience going to see a concert. There are people on the street selling tickets to concerts. The one we ended up in was in a tiny basement, the sales guys dressed up in the streets were very deceiving, but the music was excellent. I think it’s worth getting some info and splurging to see a good performance with costumes, etc. that walks you through the most historic and important Viennese music. The thing that has stayed with me the most is the wonderful music so next time I would try to see a good show.

Those would be my top recommendations.

Geoff’s Facebook album

https://www.facebook.com/geoffrey.holmes.77/media_set?set=a.10156520994580126&type=3

Who’s Kale – Best Creamy Kale Salad

If you’re looking for the best kale salad, this is it! I became hooked on kale salad when I first discovered this recipe at the Whole Foods near a dance event in Washington, DC. It was so good, I ate it for 3 days in a row.

I immediately looked it up on the internet and was not surprised to learn that other people were as keen on the same kale salad that I was. I found the recipe, though I’ve since made my own tweaks to improve it. Credit to the original internet source: http://www.eatingbirdfood.com/2011/02/garlicky-kale/

How this salad got its name

Last Sunday at Niagara VegFest I picked up a couple of I “heart” kale pieces of merchandise–a bag as well as a couple of buttons. Two days later, I was riding the subway in Toronto late at night and a guy asked me, “Who’s Kale?” which became a running joke among my other kale-loving friends. The name stuck.

Who’s Kale?

The Kale Recipe everyone’s talking about – Who’s Kale? 

  • 1 bunch raw curly kale, washed, de-stemmed and dried
  • 2 Tablespoons tahini
  • 4 Tablespoons apple cider vinegar
  • 2 Tablespoons coconut aminos, tamari, or salt to taste (I actually use soy-free miso to taste lately)
  • 6 Tablespoons nutritional yeast (or more – yum!)
  • 2 teaspoons minced garlic (1 – 2 cloves of garlic, when I’m lazy I use garlic powder)
  • 1/2 teaspoon of dijon mustard (optional)
  • a couple of tablespoons of water to thin it out to the thickness of your choice
  1. Wash, dry and remove the stems from your kale. Rip into bite size pieces and place in a large bowl.
  2. Puree all ingredients (except kale) in a blender or food processor to blend the dressing.
  3. You can make this dressing thinner by adding more water in which case you can pour it directly on to your kale and massage it in. However, I’ve since changed to keeping my dressing thick with only a couple of tablespoons of water so it’s more like a paste, and then adding my kale to it and massaging it in that way. It gives more flavour punch and sticks to the leaves better.
  4. Eat it right away, or let the salad sit in the fridge for an hour or so to marinate. You can skip this step if you need to eat right away, but allowing some time to marinate will wilt the kale a bit and make it a little softer – particularly for those who are skeptical about eating raw kale.

https://www.instagram.com/p/BX821OKgPkT/?taken-by=mandigould

https://www.instagram.com/p/BHsHSrpgj97/?taken-by=mandigould


Wikipedia has this to say about kale:

Kale or borecole (Brassica oleracea Acephala Group) is a vegetable with green or purple leaves, in which the central leaves do not form a head. It is considered to be closer to wild cabbagethan most domesticated forms. The species Brassica oleracea contains a wide array of vegetables, including broccolicauliflowercollard greens, and brussels sprouts. The cultivar groupAcephala also includes spring greens and collard greens, which are extremely similar genetically.

Want to know more about the various varieties of kale? Check out ilovekale.com.

Dapper Day 2017 at the Magic Kingdom & Epcot

Geoff, Dean, and I went to Dapper Day Spring 2017 at Disney World and had a great time! Saturday was at the Magic Kingdom and Sunday was at Epcot.

https://www.instagram.com/p/BTeXfkkgfx7/?taken-by=mandigould

https://www.instagram.com/p/BTeXTbcAEBT/?taken-by=mandigould

https://www.instagram.com/p/BTknKFVAb2r/?taken-by=mandigould

https://www.instagram.com/p/BTkn3g3gHDd/?taken-by=mandigould

https://www.instagram.com/p/BTg5cqzFC2n/?taken-by=mandigould

Surprise

Shhh… it’s a surprise!

For Geoff’s birthday, which will be just a few days before our trip to Disney World, I’ve had these custom t-shirts designed for him. I hope they arrive in time!

These are sort of “black market” custom Disney t-shirts, highlighting our own favourite inside moments at the parks. There’s a Haunted Mansion t-shirt, Haunted Mansion t-shirt, Enchanted Tiki Room t-shirt, and Carousel of Progress t-shirt.

Inspiration: Haunted Mansion /  Text: We’re assembling for a swingin’ wake


Inspiration: Twilight Zone Tower of Terror / Text: This, as you may recognize, is a maintenance service elevator still in operation, waiting for you.


Inspiration: Carousel of Progress / Text: You know that pilot fellah… Charles Lindberg? He’s about to fly a single winged airplane all the way across the Atlantic. He’s never gonna’ make it.

Inspiration: Enchanted Tikki Room / Text: My siestas are getting shorter and shorter

And they’re in! They came out great. I can’t wait to see Geoff wearing them at Disney World!

And here he is, happy as pie at the Enchanted Tiki Room.

And at the Haunted Mansion:

https://www.instagram.com/p/BTl95UwAPIK/?taken-by=mandigould

Everything You Need To Know About Green Smoothies

365 days of green smoothies! Well, I maybe take a few days off for juice fasting and vacations when I don’t carry a mini blender with me, but still… there are a lot of green smoothies in my life! I make at least 2 servings of green smoothie every morning for my husband and me, and sometimes I make extra. Green smoothies store very well in mason jars in the fridge and are perfectly good the next day, so sometimes I make a batch in advance if I know I’m going to be busy.

Green Smoothie Benefits

How many servings of fruits and veggies do you think you really eat every day? Most people just don’t get enough, and a lot fewer servings than they’d like to think. Most people only get 3-4 servings a day when they should be consuming 5-9+. More fruits, and especially vegetables, helps to regulate your blood sugar and prevents heart disease, cancer and other illnesses.

Starting your day with a green smoothie is a quick and convenient way to start your day with 3+ servings of fruits and vegetables. Blending also makes the vegetables easy to digest and assimilate, and each smoothie is full of healthy fibre. A smoothie is a particularly great way to consume leafy greens; with no chewing involved and the sweet flavour of the fruit, it couldn’t be easier to kickstart your day.

Green smoothies are full of phytonutrients and are very high in antioxidants. With all of the vitamins, minerals, and all around nutrients that you’re consuming first thing every morning, green smoothies really help boost your energy. They also help with mental clarity.

You’ll not only feel better from drinking green smoothies but you’ll look better too. Green smoothies are great for your skin and are great for weight loss and weight management. Starting your day with a green smoothie will also help to reduce your cravings for sugar and junk food.

Components of a Great Green Smoothie

I’ve been playing around with green smoothies on a daily basis for a few years now, and I’ve come to understand that a good green smoothie is made up of the following components:

  1. Leafy Greens
  2. Fruit of Choice
  3. Thickener/Something Creamy
  4. Liquid
  5. Superfoods/Supplements (optional)
  6. Sweetener (definitely optional)

1. Leafy Greens

It wouldn’t be a green smoothie if it didn’t contain a green vegetable. My preferences are spinach or kale. I use a lot of baby spinach, and generally I use one serious handful of spinach per serving. Note that my smoothie recipes are always for 2 servings, so for spinach I would use 2 big handfuls. For kale, I use 3 leaves per serving, so that’s 6 good sized leaves.

I also sometimes use mixed greens, chard, or other green vegetables that I have in the fridge. However, some of the other greens can have stronger flavours that don’t integrate into the smoothie quite as well, so I would be more conservative with other greens. Romaine, for example, is surprisingly sour in a smoothie.

On occasion, I do a wacky smoothie with something like shredded carrot instead of a green vegetable. You can also throw in the ends of raw zucchini that are left after spiralizing zucchini noodles.

2. Fruit of Choice

The defining flavour of your smoothie (unless you’re making a chocolate or peanut butter smoothie) will be the fruit that you choose. I like to use frozen fruit, and the frozen element also acts as a thickener in the smoothie. Frozen berries, particularly raspberries are my first choice, followed by mixed berries. While blueberries are delicious, they have a lot of pectin and using straight blueberries rather than a mix of berries will cause your smoothie to over-thicken and even separate. Another reason why I like raspberries is that because they have the strongest red colour and will make your green smoothie red. Other berries will give your smoothie a muddy colour when mixed with the greens, but you get over the colour pretty quickly. However, it’s still appealing to have a red smoothie once in a while, and raspberries are bold and delicious.

My second and third choices for fruit are pineapple and mango. These have good flavour profiles to go with the greens, and you have the added bonus of a bright green smoothie when you use these.

Rule of thumb: I use about 1.5 cups of fruit for 2 smoothie servings.

Note: I don’t include banana as a fruit in this context, I use it as a thickener. See below. 

3. Thickener/Something Creamy

Without a thickener, your smoothie will come out watery which is less tasty and also less filling. I don’t believe in smoothies as a “meal replacement” or just a drink – rather, to me a smoothie is a meal. Including a thickener is important. Thickeners also add a delicious creamy element. Thickeners include:

  • Banana
  • Nuts or seeds
  • Avocado
  • Coconut, hemp, or flax oil, or sunflower lecithin
  • Something frozen (like your banana, your other fruit, or ice cubes)
  • Protein Powder

Though banana is a fruit and there is other fruit in your smoothie, I find that a smoothie just isn’t the same without at least some banana in it. 1/2 to a full banana per serving is ideal. I often use 1.5 bananas for 2 servings and set aside the other half a banana to have with my lunch. If you’re not keen on banana, consider adding avocado, hemp seeds, raw cashews, almonds, or pumpkin seeds to your smoothie and definitely don’t skip a frozen element as you’ll need these other ingredients to thicken in the banana’s place.

My absolute favourite protein powder is Sunwarrior Protein-Vanilla. We include it in every single smoothie. It’s a raw vegan protein powder and the classic vanilla is delicious. The Sunwarrior Protein-Chocolate is also really good. I’ve tried a lot of different protein powders over the years and this one is by far the best. It’s tasty and makes the smoothie wonderfully creamy.

I also often add some coconut oil to my smoothie. Because coconut oil reacts to the cold, I blend it with water and all of the room temperature ingredients first before adding anything frozen. That way, it won’t get tiny specs of solid coconut oil. Hemp and flax oil can have a strong taste so you might like to add a pinch of stevia. Brazil nuts are rich in selenium which helps to prevent small tumour formation – particularly in men – and I include 3 brazil nuts per serving for my husband and me. I don’t personally use avocado in my smoothies very often but it does add a luxuriously creamy component that can be a great treat.

4. Liquid

While many people use nut milk, soy milk, coconut milk or coconut water, or even juice in their green smoothie, I absolutely don’t see the point. If you’ve used the right quality ingredients for the rest of your smoothie, you don’t need anything but filtered water. These other ingredients just contribute to a higher cost per smoothie, and also unnecessary calories. I would adjust your creamy component of your smoothies first, but if you aren’t using a protein powder for example, you might consider using a nut milk in your smoothie.

5. Superfoods/Supplements

You can also supplement your smoothie with superfoods and supplements. I always include maca, reishi, and chaga to my smoothie, as well as drops like B12, iodine, and vitamin D in the winter. There are so many supplements and superfoods available and it can be a tough field to navigate. I’ve tried most of them and it’s taken me a while to figure out what’s right for me and my husband. 6. Sweetener (Optional)

You don’t necessarily need a sweetener! However, when supplementing green smoothies with certain strong superfoods, like reishi, I do sometimes find it necessary to sweeten the smoothie if it’s become bitter. I personally always use stevia. I would never use any kind of processed sugar.

A date or two are also good choices if you have a good blender. I might consider a drop of maple syrup, agave, or coconut syrup, but stevia in either liquid drops or a pinch of the powder does the trick. Depending on the flavour profile of your smoothie, a little cinnamon can also be a nice complement.

How to Blend Your Smoothie

If you have a high powered blender like a Vitamix, you can put all of your ingredients in and not worry about the order of things. However, if you’re working with a standard blender, you can take a few steps to make things work more efficiently in your machine.

  • Start with your liquid and your base fruit. Pulse first, then blend.
  • Add your thickening ingredient. Pulse first, then blend again.
  • Add your greens. You can also add your superfoods and any powders at this stage and put the greens on top of the powder so that it doesn’t puff up. Pulse, then blend.
  • Once all of your ingredients have been added, taste your smoothie and determine if it needs a little sweetener like stevia. You can usually skip this step altogether, and definitely taste first before assuming that you need sweetening. Only bitter superfood powders should require the addition of sweeteners as the fruit is already sweet enough.
  • NB: When I include coconut oil in my smoothie, I change the order of ingredients. Because coconut oil reacts to the cold, I blend it with water and all of the room temperature ingredients first before adding anything frozen. That way, it won’t get tiny specs of solid coconut oil.

Invest in a Good Blender

My prized possession – truly, my dessert island piece of kitchen equipment – is my Vitamix. Yes, they’re pricey. However, I use it every single day and have been using it every day since I bought it in 2011. Seriously. Everyone who owns a Vitamix will say the same thing. It’s an amazing piece of equipment and you’ll never regret the purchase.

How to Wash your Blender

It wasn’t until I got a Vitamix that I learned about how to really care for a blender. Why didn’t anyone tell me about this technique sooner? When you’re done making your smoothie, give it a rinse and then fill it part way with water and some soap. Then put the lid on it and run it! It becomes a self-cleaning tool! You’ll still want to wipe it out with a sponge to make sure that no residue builds up in the various nooks and crannies but this is by far the most efficient way to clean and care for your blender.

Get into the habit of washing your blender right after use rather than letting it sit around. With this method, cleaning is super quick so there’s no reason to leave it sitting around, especially not over night. I like to flip my blender upside down to let the water drip out while it’s drying.

More Dresses for Sale

I’m selling some dresses. Open to offers. The prices are listed in USD but I’m open to offers in CAD.

Prices do not include shipping from Canada. Shipping to US destinations is $17 USD. Shipping to Canadian destinations is $18.50 CAD. If you’re Canadian and would like to make an offer for everything in CAD, just give me a shout.

“Alice” Dress – L – $25 USD


“Summer of Love” Dress – L – $25 USD

Eva Franco Dress – size 10 – $30 USD

No longer has the belt, therefore the great price.

Charming Blue Dress – XL – $25

Damzels Seahorse Dress – L – $25

Please contact me if you’re interested in any of these items.

Click here to see more dresses.